Free visual project calculator
Wall Framing Calculator with Windows & Doors
Calculate how many wall studs and framing materials you need from wall length, height and on-center spacing. Add doors and windows to include king studs, jack studs, cripples, headers and plates in the material list. See the <a href="/guides/wall-framing-calculator"><strong>worked wall framing example with a door and window</strong></a> for the framing takeoff method.
PlanDIYBuild visual guide
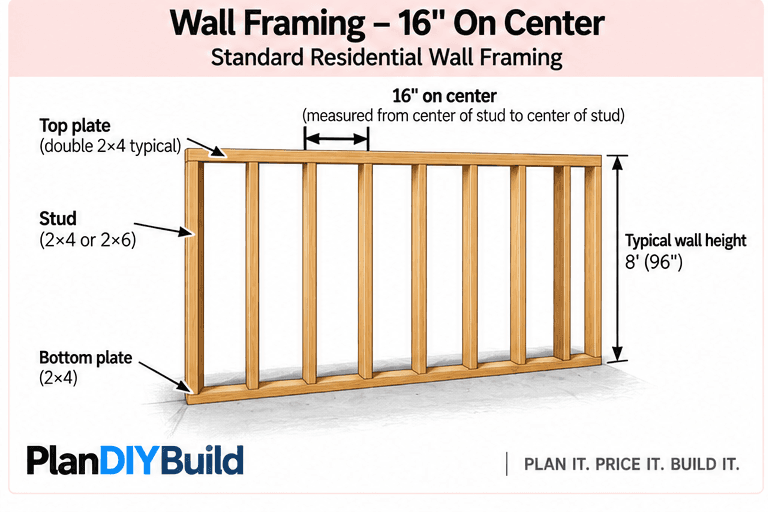
Wall framing — 16 inches on center
See the basic relationship between top plates, studs, bottom plate, wall height and on-center stud spacing before planning your framing takeoff.
PROJECT INPUTS
Start with the essentials
Enter the wall size and basic framing layout first. Stock, header, blocking, sheathing and waste assumptions stay below.
Units
10common studs
3plate boards
4sheathing panels
LIVE WALL ELEVATION
16 in OC12.0 ft × 8.0 ft wall
CommonKingJackHeaderCripple
CUSTOMIZE PROJECT DETAILSAdjust stock, header, blocking & waste assumptions+
DOORS & WINDOWS
Place openings on the wall
Add each rough opening and locate it from the left end. The elevation and framing takeoff update together.
View full calculation details
Common studs10
Bottom plate12.0 linear ft
Double top plate24.0 linear ft
Full-height framing boards to buy11 boards
Plate boards to buy3 boards
Sheathing panels to buy4 panels
Framing nail allowance150 fasteners
Where these assumptions come from
Manufacturer and industry estimating values are separated from PlanDIYBuild planning allowances.
Header note: header size shown here is the stock you selected for estimating only. PlanDIYBuild does not structurally size headers. Verify load-bearing conditions, span, species/grade and local code requirements before construction.
PROJECT TAKEOFF
What you'll need
Key purchase quantities from the same complete BOM used below.
3 board2×4×16 plate lumber2×4 × 16-ft stock
11 board2×4×8 framing lumber2×4 × 8-ft stock
150 fastenerFraming fasteners
4 piece4×8 wall sheathing4×8 sheet
The preview and copied list come from the shared BOM. Planning estimate — verify product sizes, structural requirements and local conditions before purchasing.
PURCHASE PLAN
Materials & tools
Your project quantities with practical planning prices.
Materials to buy
3 2×4×16 plate lumberWall framing · board · 2×4 × 16-ft stock · Bottom and double-top plate stock including selected waste.$30.00$10.00 / board · estimated planning price
11 2×4×8 framing lumberWall framing · board · 2×4 × 8-ft stock · Full-height common and king stud purchase allowance including selected waste.$55.00$5.00 / board · estimated planning price
150 Framing fastenersWall framing hardware · fastener · Planning allowance only; fastener type, size and schedule must match the wall assembly and local requirements.$10.50$0.07 / fastener · estimated planning price
4 4×8 wall sheathingWall sheathing · piece · 4×8 sheet · 4×8 sheet planning quantity including selected sheathing waste; choose sheathing appropriate for the wall assembly.$88.00$22.00 / panel · estimated planning price
Tool & supply plan
Required / common
✓Tape measureLayout · estimated $12.00 purchase cost
✓Pencil / markerLayout · estimated $5.00 purchase cost
✓Chalk lineLayout · estimated $15.00 purchase cost
✓Framing squareLayout · estimated $12.00 purchase cost
✓4-ft levelLayout · estimated $35.00 purchase cost
✓Circular or miter sawCutting · estimated $180.00 purchase cost
✓Drill / impact driverFastening · estimated $120.00 purchase cost
✓ClampsAssembly · estimated $30.00 purchase cost
Specialty / rent or buy
✓Hammer or framing nailerFastening · estimated $55.00 rental cost
Consumables / safety
✓Safety glassesPPE · estimated $12.00 purchase cost
✓Hearing protectionPPE · estimated $20.00 purchase cost
✓Work glovesPPE · estimated $15.00 purchase cost
Estimated specialty rentals: $55.00
Estimated consumables / PPE: $47.00
Incremental project spend: $102.00
Common tools if starting from scratch: $409.00
Buy every tool / supply from scratch: $706.00
Tool prices are planning estimates. Confirm current prices, the exact installation method, manufacturer instructions and safety requirements before purchasing or renting.
Completeness check: Studs, plates, selected header stock, blocking, sheathing and framing-fastener allowances are quantity-driven from the wall geometry and openings. Header sizing, load path, fire blocking, bracing, fastening schedules and structural requirements must match the actual wall design and local code.
Pricing: material subtotal $183.50 + tools / rentals $102.00. Project total $311.19 uses PlanDIYBuild planning prices. Actual retailer prices vary by product, store and location.
ESTIMATED PROJECT COST
Open full budget in MyBuild →$195–$427
Likely project range · 54% estimate confidence
Materials$184
Labor$0
Tools / rentals$102
Project total$311
Materials use PlanDIYBuild U.S. planning estimates. Retailer prices vary by product, store and location. Tools / rentals are planning estimates.
Cost assumptions & priced materials
3 × $10.00 — 2×4×16 plate lumber · 2×4 × 16-ft stock · Estimated planning price · US regional fallback$30
11 × $5.00 — 2×4×8 framing lumber · 2×4 × 8-ft stock · Estimated planning price · US regional fallback$55
150 × $0.07 — Framing fasteners · Estimated planning price · US regional fallback$11
4 × $22.00 — 4×8 wall sheathing · 4×8 sheet · Estimated planning price · US regional fallback$88
Estimated specialty rentals$55
Estimated consumables / PPE$47
Common tools if not already owned$409
Tool amounts are broad planning allowances, not current retailer or rental quotes. The incremental project-spend allowance assumes common tools are already owned and adds specialty rentals plus consumables / PPE. Reusable tools and rentals are shared across a combined saved-project budget when the same tool appears more than once; consumables / PPE remain budgeted per project. Buy-all totals use purchase allowances for every tool rather than rental allowances. Actual availability, tax, delivery, site conditions and labor may differ.
BUILD YOUR WALL
Your project, from layout to finished framing.
Your calculator choices and quantities stay with you through the same practical homeowner roadmap used across PlanDIYBuild project families.
BEFORE YOU START
TimeHalf day–2 days for a typical non-finished wall
Local / structural checkVerify load-bearing status, header requirements, bracing, fire blocking, fastening schedules, utilities and local code before construction.
SafetyUse task-appropriate eye, hearing, hand, respiratory and lifting protection.
YOUR BUILD ROADMAP
0 of 9 steps complete · Next: Confirm the wall plan
Confirm the wall plan
Confirm wall length, height, opening locations and whether the wall is load-bearing before cutting material. Verify the approved wall assembly, required stud size / spacing, opening rough sizes, header design, bracing / shear requirements, fire blocking and connector / anchorage details before treating calculator quantities as a construction plan.
12 × 8 ft wall
✓Wall dimensions, openings and approved structural / assembly requirements confirmed
Tape measure · Pencil / marker
Lay out plates and stud centers
Mark matching top and bottom plates from one reference end using the selected on-center spacing. Mark every door and window opening before fastening anything.
10 common studs · 11 boards full-height framing boards
✓Stud centers and openings marked on both plates
Tape measure · Chalk line · Framing square
Cut and position plates
Cut the bottom and top plates to the planned wall length. Use the plate material, number of top-plate plies, joints / laps, anchorage and treated-lumber requirements specified for the actual wall assembly; exterior / slab-contact conditions can differ from an interior partition.
12.0 linear ft bottom plate · 24.0 linear ft double top plate
✓Plate material, lengths, joints / laps and anchorage details verified
Framing square · Circular or miter saw
Cut and install common studs
Cut full-height studs to the required wall height and install them at the marked centers, keeping crowns oriented consistently where practical.
10 common studs to install
✓Common studs aligned, plumb and on layout
4-ft level · Circular or miter saw · Hammer or framing nailer
Frame doors and windows
Install the king / jack studs, sill and cripple framing required by the approved wall design and actual door / window manufacturer rough-opening requirements. Keep openings square, and provide required backing / framing for connections without assuming the calculator determines structural member counts.
0 king studs · 0 jack studs
✓Rough openings square; manufacturer dimensions and structural opening framing verified
Tape measure · Framing square · 4-ft level
Install approved header assemblies
Install the header size, material, ply count, bearing / support and connection detail required by the approved structural design. Calculator quantities estimate material only and must not be used to select or validate a structural header.
0 header assemblies · 0 boards header stock boards
✓Header size, bearing, support and connections verified from the approved design
4-ft level · Hammer or framing nailer · Clamps
Add cripples and blocking
Install calculated cripple studs above and below openings and add the selected blocking rows while maintaining the wall layout.
0 cripple studs · 0.0 linear ft blocking
✓Cripples and blocking complete without conflicts
Circular or miter saw · Hammer or framing nailer
Sheath or brace the wall
Install the required wall sheathing / bracing from the approved wall design with specified panel orientation, edge support / blocking, panel gaps, fastener type / spacing and boundary connections. Do not substitute the calculator sheathing quantity for a braced-wall or shear-wall design.
4 panels sheathing panels
✓Approved bracing / sheathing layout, edge support and fastening complete
Tape measure · Circular or miter saw · Hammer or framing nailer
Plumb, square & complete inspection
Check wall straightness / plumb, opening dimensions, plate alignment, anchorage, connectors, fasteners, bracing and load path. Complete required framing / structural inspection and correct deficiencies before insulation, utilities or finishes conceal work that must remain visible for inspection.
150 fasteners framing fasteners
✓Required framing / structural checks and inspections complete before concealment
Tape measure · 4-ft level
Project roadmap only. Calculated quantities come from your PlanDIYBuild takeoff; structural, code, site and product-specific requirements must be verified before construction.
Planning references
Examples and related project steps
Check the worked examples or continue with the next part of your material plan.
Need more detail?
Check the method or common questions
Method, formula & assumptions
Wall framing calculator for studs, plates and openings
Formula: Start with a regular on-center stud grid, then replace framing at each entered door or window with king studs, jack studs, a selected header and the required cripple positions. This estimates one straight wall; additional corner and wall-intersection framing is not modeled. Bottom and double top plates are calculated from wall length; purchase quantities add the selected waste allowance and round to whole stock pieces.
Worked example: Example: a 12 ft uninterrupted wall at 16 in on-center spacing has 10 common stud positions, 12 linear ft of bottom plate and 24 linear ft of double top plate, before extra material. Use the linked framing guide for a calculated door-and-window example.
Before you buy: This is a material and layout planning tool, not structural engineering. Header size, load-bearing conditions, bracing, fire blocking, member species/grade, fastening schedules and local code requirements must be verified for the actual wall.
Wall Framing Planner FAQ
How many studs do I need for a wall?
Stud count depends on wall length, on-center spacing, wall ends and openings. Start with the selected stud grid, then account for king, jack and cripple studs around doors and windows.
Does this calculator work with 16 or 24 inch stud spacing?
Yes. Choose the on-center spacing used by your project and the planner updates the stud layout and material takeoff. Verify the required spacing for the actual wall design and applicable requirements.
Does this calculator size structural headers?
No. You select header stock for quantity and cost planning. Required header size depends on loads, span, building configuration, lumber species/grade and local requirements.
Why can the purchase quantity differ from the member count?
The elevation shows framing members, while the purchase estimate converts those members and short-piece linear footage into whole stock boards and adds your selected waste allowance.
Keep planning
Continue your Walls & Finishes project
Use the Walls & Finishes planning hub for related calculators and quick-reference guides.
Project shopping
Useful products for this project
Photos are representative examples of the item type—not the exact Amazon listing. Amazon links open current search results so you can compare brands, sizes and prices.
 Representative product photo
 Representative product photo
 Representative product photo
LOOKING FOR SOMETHING ELSE?
Search opens Amazon results in a new tab. PlanDIYBuild adds “for wall framing project” to help narrow the results.Find something for this project
Tell PlanDIYBuild what you need. We’ll add project context so the search stays relevant.
Independent recommendationsPlanDIYBuild does not rank products by commission, and calculator results do not change based on affiliate relationships.As an Amazon Associate, PlanDIYBuild earns from qualifying purchases. Verify product dimensions, compatibility, coverage and manufacturer instructions before purchasing.